# Velociraptor P1

### 1. Introduction

Velociraptor is an advanced digital forensic and incident response tool that enhances your visibility into your endpoints. In this exercise we'll setup a velociraptor server based on linux and connect a windows client to it. Further we'll collect our first artefact.

### 2. Setup

Prerequisite:

* Linux VM (<https://livecd.hacking-lab.com/>)
* Windows 10 VM (<https://developer.microsoft.com/en-us/microsoft-edge/tools/vms/>)

Velociraptor can be run on windows, linux and macOSX. In this case I'll run velociraptor on a virtual linux machine and I'll setup a windows box which is connected to the velociraptor server.

<div align="left"><img src="https://3977837039-files.gitbook.io/~/files/v0/b/gitbook-x-prod.appspot.com/o/spaces%2F-MfT0VPyK6X13Egd9pzy%2Fuploads%2F5MTSB3zChCDtXGo0tOLX%2Fsetup.png?alt=media&#x26;token=a11c53fb-0040-422c-a038-680f7fcc9800" alt=""></div>

[Original Lab](https://samsclass.info/152/proj/IR371.htm) developed by SAM BOWNE:

{% embed url="<https://samsclass.info/>" %}

### 3. Installation

```
mkdir Velociraptor
cd Velociraptor
wget https://github.com/Velocidex/velociraptor/releases/download/v0.6.4-2/velociraptor-v0.6.4-2-linux-amd64
chmod +x velociraptor-v0.6.4-2-linux-amd64
./velociraptor-v0.6.4-2-linux-amd64 config generate > velociraptor.config.yaml
```

Edit the `velociraptor.config.yaml` configuration file and replace every localhost or 127.0.0.1 entry with the ip address of the virtual machine.&#x20;

![](https://3977837039-files.gitbook.io/~/files/v0/b/gitbook-x-prod.appspot.com/o/spaces%2F-MfT0VPyK6X13Egd9pzy%2Fuploads%2F3edOhZXDQ8PYSzHxo62S%2Fvelociraptor01.png?alt=media\&token=1222111b-1855-4564-af84-6814bec1904f)

`mv velociraptor.config.yaml /etc`

Set administrator password:

```
./velociraptor-v0.6.4-2-linux-amd64 --config /etc/velociraptor.config.yaml user add admin --role administrator
```

Start Velociraptor GUI:

```
./velociraptor-v0.6.4-2-linux-amd64 --config /etc/velociraptor.config.yaml frontend -v 
```

![](https://3977837039-files.gitbook.io/~/files/v0/b/gitbook-x-prod.appspot.com/o/spaces%2F-MfT0VPyK6X13Egd9pzy%2Fuploads%2FUefJBaJxG4amSQCk9jdA%2Fvelociraptor02.png?alt=media\&token=a88b9902-38b8-4487-ba7d-fb3f4f0a6dbc)

The basic setup of velociraptor is now up and running. We can  now start to add clients in our velociraptor environment.

### 4. Adding Windows Client

Edit the `velociraptor.config.yaml` file again.&#x20;

Scroll down to the first END CERTIFICATE line.

<div align="left"><img src="https://3977837039-files.gitbook.io/~/files/v0/b/gitbook-x-prod.appspot.com/o/spaces%2F-MfT0VPyK6X13Egd9pzy%2Fuploads%2F8U38JctTOXjfi1RmmB6U%2Fvelociraptor03.png?alt=media&#x26;token=12afd9e2-0a52-4755-b032-49b2debcdda5" alt=""></div>

Below the "nonce: line, insert this line, as shown in the image above.

`use_self_signed_ssl: true`

Prepare Client installer for windows:

```
cd Velociraptor
./velociraptor-v0.6.4-2-linux-amd64 --config /etc/velociraptor.config.yaml config client > client.config.yaml

wget https://github.com/Velocidex/velociraptor/releases/download/v0.6.4-2/velociraptor-v0.6.4-2-windows-amd64.exe

./velociraptor-v0.6.4-2-linux-amd64 config repack --exe velociraptor-v0.6.4-2-windows-amd64.exe client.config.yaml repackaged_velociraptor.exe
```

![](https://3977837039-files.gitbook.io/~/files/v0/b/gitbook-x-prod.appspot.com/o/spaces%2F-MfT0VPyK6X13Egd9pzy%2Fuploads%2FnZBxxauRy3pUHq9fpIgA%2Fvelociraptor04.png?alt=media\&token=4d0e7682-4269-4d2f-b034-97b8cd27a0da)

I'm using winscp to transfer the repacked exe file to my windows box

![](https://3977837039-files.gitbook.io/~/files/v0/b/gitbook-x-prod.appspot.com/o/spaces%2F-MfT0VPyK6X13Egd9pzy%2Fuploads%2FVtgvfSLKjzb1KLNitQlB%2Fvelociraptor05.png?alt=media\&token=a6065f38-307d-4ceb-97e9-1d4e73371213)

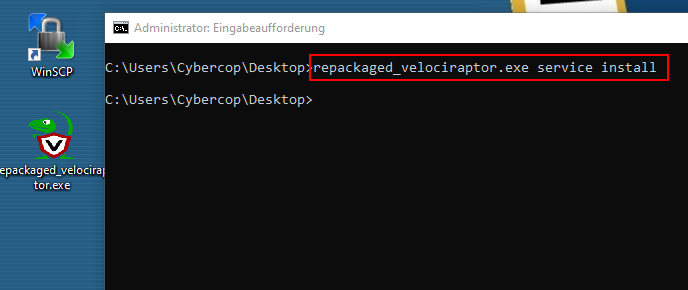
Open a elevated cmd prompt:

```
cd %userprofile%\Desktop
repackaged_velociraptor.exe service install
```

<div align="left"><img src="https://3977837039-files.gitbook.io/~/files/v0/b/gitbook-x-prod.appspot.com/o/spaces%2F-MfT0VPyK6X13Egd9pzy%2Fuploads%2FQN9EGZa2BVTFrrVGbZ8k%2Fvelociraptor06.png?alt=media&#x26;token=665deef6-0ae8-4a40-a862-b87b308ebe10" alt=""></div>

### 5. Viewing the Client

![](https://3977837039-files.gitbook.io/~/files/v0/b/gitbook-x-prod.appspot.com/o/spaces%2F-MfT0VPyK6X13Egd9pzy%2Fuploads%2Fkx7l1CN66UOqv3sGU0u6%2Fvelociraptor07.png?alt=media\&token=a6ed0d04-b98a-46b9-9936-66cd75eb2b7e)

We have now full control over the client, can browse trough the **filesystem** and **registry** or **collecting some artefacts**!

![Exploring Filesystem](https://3977837039-files.gitbook.io/~/files/v0/b/gitbook-x-prod.appspot.com/o/spaces%2F-MfT0VPyK6X13Egd9pzy%2Fuploads%2FF0q047Jrn81g9xUDICGC%2Fvelociraptor08.png?alt=media\&token=443e7d94-dd54-4810-b16d-c7d5fd59c5cc)

![Exploring Registry](https://3977837039-files.gitbook.io/~/files/v0/b/gitbook-x-prod.appspot.com/o/spaces%2F-MfT0VPyK6X13Egd9pzy%2Fuploads%2FBgUiFcYOoyC85xiVjLyt%2Fvelociraptor09.png?alt=media\&token=4345fefb-2804-4f76-a87c-337f638be4f8)

### 6. Collecting first artifact

At the top left, click the house icon to go to the home page, which shows "Server status".

At the top center, click the "**Show All**" button.

In the "Client ID" column, click the blue link.

At the top center, click the **Collected** button.

At the top left, click the plus-sign (see image below)

![](https://3977837039-files.gitbook.io/~/files/v0/b/gitbook-x-prod.appspot.com/o/spaces%2F-MfT0VPyK6X13Egd9pzy%2Fuploads%2Fu10XqAic5rskc8is38Sm%2Fvelociraptor10.png?alt=media\&token=0a1d69e2-7761-455f-b963-f24d780802ce)

At the top left, in the search box, type **netstat**.

Click **Windows.Network.NetstatEnriched**.

A description of this artifact appears, as shown below.

<div align="left"><img src="https://3977837039-files.gitbook.io/~/files/v0/b/gitbook-x-prod.appspot.com/o/spaces%2F-MfT0VPyK6X13Egd9pzy%2Fuploads%2F81N4AkDTn3hXqOqwA1Fk%2Fvelociraptor11.png?alt=media&#x26;token=c3a029c0-4621-4218-9cc8-3ee8c3ef7139" alt=""></div>

At the lower left, click the blue "**Configure Parameters**" link.

At the top left, click the wrench icon.

In the "ProcessNameRegex" field, enter **velociraptor.\*** as shown below.

<div align="left"><img src="https://3977837039-files.gitbook.io/~/files/v0/b/gitbook-x-prod.appspot.com/o/spaces%2F-MfT0VPyK6X13Egd9pzy%2Fuploads%2FpOuH4OpR508P4XU8gJ9E%2Fvelociraptor12.png?alt=media&#x26;token=b9b85e38-f482-42bc-abfa-9ed0c476c357" alt=""></div>

At the lower right, click the blue **Launch** link.

In the next screen, at the top center, click the **Windows.Network.NetstatEnriched** line to highlight it. In the lower pane, click the **Results** tab.

You see information about the Velociraptor process, as shown below:

![](https://3977837039-files.gitbook.io/~/files/v0/b/gitbook-x-prod.appspot.com/o/spaces%2F-MfT0VPyK6X13Egd9pzy%2Fuploads%2Fy3RGu9flNhxuF8uHnqpK%2Fvelociraptor13.png?alt=media\&token=a9abff58-f146-4a04-9233-dbec7693c9f2)

As we know the basics, we can practise a little bit ;-)&#x20;
