# Disk acquisition with ewftools

![](https://3977837039-files.gitbook.io/~/files/v0/b/gitbook-x-prod.appspot.com/o/spaces%2F-MfT0VPyK6X13Egd9pzy%2Fuploads%2FBQSNpZbs68oncjtthHjC%2Fewf-678x381.jpg?alt=media\&token=e045f557-6d38-4bb8-8b50-8138e6f2e3aa)

### 1. Introduction

> Image acquisition involves making a copy (or several copies) of the seized hard disk which can be then used to forensics analysis. This allows the investigators to analyze this image while ensuring the integrity and present condition of the real evidence disk.

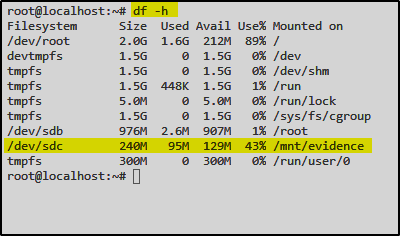
In this lab, the evidence hard disk is mounted on ‘/dev/sdc’. The [**ewf-tools**](https://github.com/libyal/libewf) are installed on the lab machine. The tool uses the Expert Witness Compression Format (EWF).

### 2. Create Image with ewf-tools

First I’ll check if the disk is mounted on the filesystem

`df -h`

<div align="left"><img src="https://3977837039-files.gitbook.io/~/files/v0/b/gitbook-x-prod.appspot.com/o/spaces%2F-MfT0VPyK6X13Egd9pzy%2Fuploads%2FZ2EWask5ReLsKnPzm37R%2Fewf1.png?alt=media&#x26;token=fe7df60f-b87a-4f2c-a90c-d5f481a16098" alt=""></div>

To prevent any failures during disk imaging, let’s unmount the disk first

<div align="left"><img src="https://3977837039-files.gitbook.io/~/files/v0/b/gitbook-x-prod.appspot.com/o/spaces%2F-MfT0VPyK6X13Egd9pzy%2Fuploads%2FkyimYqggQTUK52pvc4a7%2Fewf2.png?alt=media&#x26;token=23fe3a19-d0d4-40ad-9748-58355a7fcab8" alt=""></div>

`umount /dev/sdc`

Everything is prepared now to use ewfacquire to create a disk image

`ewfacquire /dev/sdc`

<div align="left"><img src="https://3977837039-files.gitbook.io/~/files/v0/b/gitbook-x-prod.appspot.com/o/spaces%2F-MfT0VPyK6X13Egd9pzy%2Fuploads%2FWQuuoRRljk3FT0XSn6FK%2Fewf3.png?alt=media&#x26;token=07a828a6-9587-4589-8811-61c89e38cd37" alt=""></div>

Further you can enter some more informations like Case Number, Description or Examiner name..

For all the other options I’ll leave the default values:

<div align="left"><img src="https://3977837039-files.gitbook.io/~/files/v0/b/gitbook-x-prod.appspot.com/o/spaces%2F-MfT0VPyK6X13Egd9pzy%2Fuploads%2FHxh5T3IZ45Vhe42M9fKs%2Fewf4.png?alt=media&#x26;token=f71dcc22-04bd-4437-a9ed-0a8693e6dc4e" alt=""></div>

Let’s start the process:

<div align="left"><img src="https://3977837039-files.gitbook.io/~/files/v0/b/gitbook-x-prod.appspot.com/o/spaces%2F-MfT0VPyK6X13Egd9pzy%2Fuploads%2F6FA99v63Bp5CDph7rpZX%2Fewf5.png?alt=media&#x26;token=f4ebdca5-c235-4893-b973-b759cebb6e1a" alt=""></div>

To verify the disk image we can use the following command:

`ewfinfo evidence.E01`

<div align="left"><img src="https://3977837039-files.gitbook.io/~/files/v0/b/gitbook-x-prod.appspot.com/o/spaces%2F-MfT0VPyK6X13Egd9pzy%2Fuploads%2FQ7YDGiwkGUiaD2pHlp9t%2Fewf6.png?alt=media&#x26;token=71c2ab30-79a7-4e82-b82c-733690ab61c5" alt=""></div>

### 3. Summary

{% embed url="<https://vimeo.com/676882680>" %}
